Ubiquiti UniFi with Cloud Key


The compatibility of the Ubiquiti UniFi system with the SOCIFI platform was tested on the controller version 5.4.11 (Build: atag_5.4.11_9184) and UniFi AP version 3.7.49.6201. This manual presumes a preconfigured controller with associated APs.
Important notice
The release of the Unifi Controller Firmware 5.10.12 is not compatible with SOCIFI at this moment. Please DO NOT UPGRADE to this version. If the the firmware is already updated to the latest version, please rollback the firmware to the previous version to keep the SOCIFI external portal service running.
We will inform you when the necessary changes are done and when the new version of the FW is compatible.
Information Update
The issue was caused by a bug on the firmware for APs in 5.10.12 and should be fixed in version 5.10.16
See https://community.ubnt.com/t5/UniFi-Updates-Blog/UniFi-Network-Controller-5-10-16-Stable-Candidate-has-been/ba-p/2674811 section bugfixes, Fix external guest portal cookies.
Information Update
The Ubiquiti community confirmed the bug was not definitely resolved in 5.10.16
Now the community announced resolving the bug in 5.10.17, However, the same issue was reported again on Ubiquiti portal.
As reported from users the issue was resolved after keeping the controller version on 5.10.16 or 5.10.17 and downgrading the firmware of the APs to 4.0.15 See
https://community.ubnt.com/t5/UniFi-Wireless/Change-params-for-external-redirect-after-update-to-5-10-12/m-p/2673362#M366635
1. Guest Control
1.1 Guest Policies
Login to the UniFi Controller and Click on "Settings" - "Guest Control"
Set the Guest Policies options with the following values:
| Enable Guest Portal | checked |
|---|---|
| Authentication | External portal server |
| Custom Portal IP Address | According to geolocation table (see below) |
| Redirection | |
| Use Secure Portal | unchecked |
| Redirect using hostname | http://connect-ip.socifi.com |
| Enable HTTPS Redirection | unchecked |
Portal IP selection table according to geolocation:
| Europe, Africa, Middle East | 52.51.203.246 |
|---|---|
| North America | 52.44.151.156 |
1.2 Access Control
Under the Access Control section click "Add Hostname or Subnet" and enter the allowed subnet. Repeat this for all SOCIFI and CDN required subnets. Even if entering a hostname is allowed, the DNS translation functionality is limited and not recommended by SOCIFI.
List of IP addresses needed for SOCIFI service
| IP / range |
|---|
| 52.51.203.246/32 |
| 52.44.151.156/32 |
| 54.232.88.133/32 |
54.251.110.178/32 |
| List of IP ranges for use with SOCIFI service | List of IP ranges for enabling social networks login | ||||
| CDN | Facebook/Instagram | ||||
13.32.0.0/15 13.35.0.0/16 13.54.63.128/26 13.59.250.0/26 13.224.0.0/14 34.195.252.0/24 35.162.63.192/26 52.15.127.128/26 52.46.0.0/18 52.52.191.128/26 52.57.254.0/24 52.66.194.128/26 52.78.247.128/26 52.84.0.0/15 52.199.127.192/26 52.212.248.0/26 52.220.191.0/26 52.222.128.0/17 54.182.0.0/16 54.192.0.0/16 54.230.0.0/16 54.233.255.128/26 54.239.128.0/18 54.239.192.0/19 54.240.128.0/18 70.132.0.0/18 71.152.0.0/17 99.84.0.0/16 143.204.0.0/16 204.246.164.0/22 204.246.168.0/22 204.246.174.0/23 204.246.176.0/20 205.251.192.0/19 205.251.249.0/24 205.251.250.0/23 205.251.252.0/23 205.251.254.0/24 216.137.32.0/19 | 216.239.32.0/19 64.233.160.0/19 66.249.64.0/19 72.14.192.0/18 209.85.128.0/17 66.102.0.0/20 74.125.0.0/16 64.18.0.0/20 207.126.144.0/20 173.194.0.0/16 216.58.192.0/19 108.177.8.0/21 172.217.0.0/19 108.177.96.0/21 | 31.13.24.0/21 31.13.64.0/18 45.64.40.0/22 66.220.144.0/20 69.12.56.0/21 69.171.224.0/19 69.63.176.0/20 74.119.76.0/22 103.4.96.0/22 129.134.0.0/16 157.240.0.0/16 173.252.64.0/18 179.60.192.0/22 185.60.216.0/22 204.15.20.0/22 | 69.12.56.0/21 103.252.112.0/22 104.244.40.0/21 185.45.4.0/21 188.64.224.0/21 192.44.68.0/23 192.48.236.0/23 192.133.76.0/22 199.16.156.0/22 199.59.148.0/22 199.69.58.0/23 199.96.56.0/21 202.160.128.0/22 192.229.128.0/17 93.184.208.0/20 | 91.225.248.0/23 103.20.94.0/23 108.174.0.0/22 108.174.4.0/24 108.174.8.0/22 108.174.12.0/23 144.2.0.0/22 144.2.192.0/24 216.52.16.0/23 216.52.18.0/24 216.52.20.0/23 216.52.22.0/24 65.156.227.0/24 8.39.53.0/24 185.63.144.0/24 185.63.147.0/24 199.101.161.0/24 64.152.25.0/24 8.22.161.0/24 | |
Due to the problems with the activation of the captive portal on IP-based Walled Garden systems with many allowed IP ranges, add these ranges only if you want to use the Social Network Login.
Generally, we cannot recommend using the Social Network Login on IP-based hotspot systems.

2.1 Profiles
2.1 RADIUS Profiles
Click on "Profiles". Under the section "Radius Profiles" click on "Create New Radius Profile". Set the RADIUS Auth Servers with following options:
| Profile Name | ad lib |
|---|---|
| RADIUS Auth Server | |
| IP address | see bellow for RADIUS server selection |
| Port | 1812 |
| Password/Sh. Secret | socifi |
Click on "Add Auth Server" and repeat procedure for the secondary Auth server.
Check the option "Enable Accounting". Set the RADIUS Accounting Servers with following options:
| RADIUS Accounting Server | |
|---|---|
| IP address | see bellow for RADIUS server selection |
| Port | 1813 |
| Password/Sh. Secret | socifi |
Click on "Add Accounting Server" and repeat procedure for the secondary Accounting server.
Click on "Save"
We recommend to use this set of RADIUS servers:

3. Wireless Networks
Click on "Settings" - "Wireless Networks"
Select the SSID intended for use with SOCIFI and click on "Edit".
Configure the network with the following values:
| Name/SSID | ad lib |
|---|---|
| Enabled | checked "Enable this wireless network" |
| Security | Open (recommended) |
| Guest Policy | checked "Apply guest policies" |

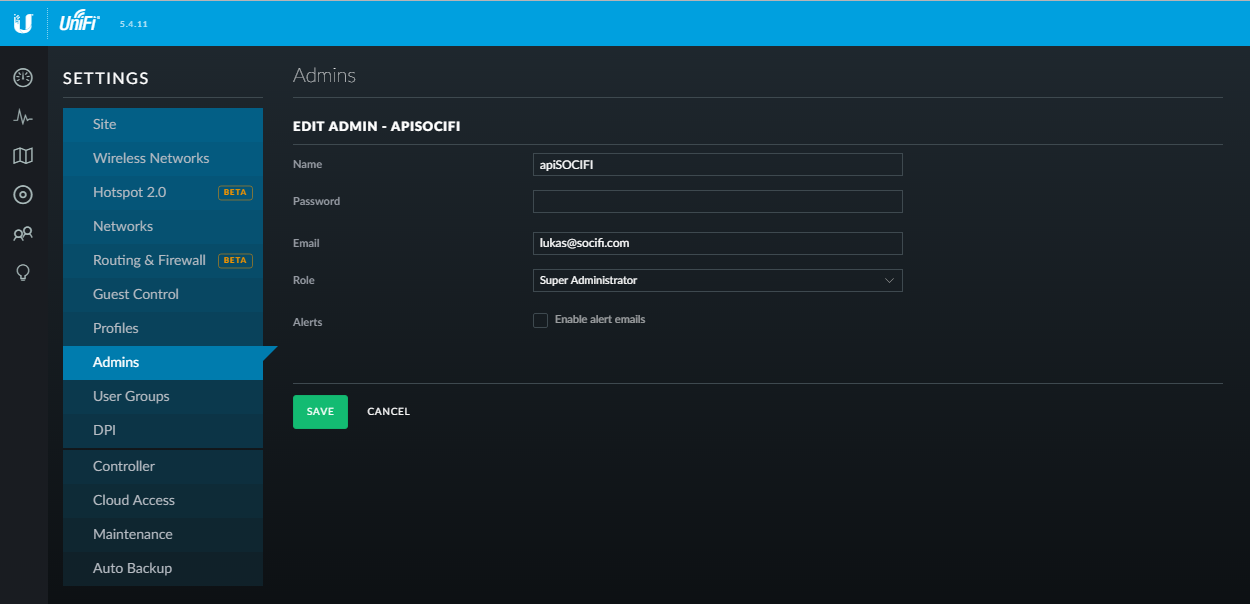
4. Admins
Click on "Admins" and create a new admin profile for API communication. This account must be set in the SOCIFI Dashboard when adding a new Ubiquity hotspot
Click on "Add New Admin" and enter the following values:
| Name | ad lib (eg. apiSOCIFI) |
|---|---|
| Invite to Controller | Manually |
| Pasword | enter a secure password |
| Require the user to change their password | unchecked |
| ad lib | |
| Role | Super Administrator |
Click on "Create"
IMPORTANT NOTICE:
Enablig API Access
It is necessary to forward the TCP port 8443 to UniFi controller on your NAT service or to assign a public IP to the UniFi controller. This will allow to communicate the SOCIFI portal with UniFi API.
The access to the port shall be allowed for the following list of IP addresses:
Make sure your Firewall Settings are set correctly.
If you have a Firewall, it may or may not block the communication / connection to SOCIFI Servers (Captive Portal, API endpoints, RADIUS servers).
The following IP Addresses have to be passed thru the Firewall or any other blocking mechanism to successfully reach SOCIFI. Without allowing these IP Addresses to go thru your Firewall, your deployment cannot work properly.
API Access is used by Ruckus, Ubiquiti and ANTlabs devices
VPC:
use-1: 52.44.148.136
euw-1: 52.18.131.55
aps-1: 52.77.200.241
sae-1: 54.233.193.15

non-VPC:
euw-1: 54.246.88.74
use-1: 54.204.47.201
aps-1: 54.251.110.178
sae-1: 54.232.124.137
5. Registering in Dashboard
5.1 Locating the MAC for the registration in SOCIFI Dashboard.
Click on "Devices". The MAC address for registration is in the column "Device Name". All listed AP devices must be registered in SOCIFI Dashboard.

5.2 Hotspot Registering
Step 1: Login to SOCIFI Dashboard
Step 2: Click on the "Hotspots" tab on the left sidebar

Step 3: Click on the “Add a new hotspot” button located on the top right corner on the screen (pictured below)

Note: A pop-up window will appear (below)

Step 4: Select the Wi-Fi hardware manufacturer from the drop down menu

Step 5: Enter the serial number or MAC address (depending on the specific equipment manual) of your equipment. You can add multiple hotspots at once.

Step 6: Set your Network location (this step is essential for correct ad targeting)


Step 8: In the pop-up window type your location or just move the marker on the map and click on the save button to confirm the selection. This address is used for ad GEO targeting.

Step 9: Click Save
Note: Newly added hotspot are marked as ![]() (Hotspot pending). After the first user connects to the hotspot via SOCIFI, the status will automatically change and appear as
(Hotspot pending). After the first user connects to the hotspot via SOCIFI, the status will automatically change and appear as ![]() (Active) within an hour. Get your first connections to test if it works properly.
(Active) within an hour. Get your first connections to test if it works properly.