Fortinet & FortiGate
FortiGate Management App for Fortinet AP was tested.
| Tested Firmware Version | v5.4.0 build1011 (GA) |
Fortinet has restrictions such as IP-Based Walled Garden and No Bandwidth Management per user. Keep this in the mind and adjust your business goals based on these restrictions.
RADIUS & User Group Settings
Two servers are required for authentication and accounting.
We recommend to use this set of RADIUS servers:
In the settings, under the tab User&Device / RADIUS Servers you need to create a record for primary and secondary RADIUS server with the following settings:
| Name | rad_SOCIFI |
|---|---|
| Primary Server IP/Name | <name of the primary server - see above> |
| Primary Server Secret | socifi |
| Secondary Server IP/Name | <name of the secondary server - see above> |
| Secondary Server Secret | socifi |
| Authentication Method | PAP |
| NAS IP / Called Station ID | |
| Include in every User Group | <not checked> |


As the next step, you need to create a user in User&Device / User Definition settings:
| User Name | SOCIFI_guest |
|---|---|
| Disable | <not checked> |
| select of authentication method | Match user on RADIUS server |
| Match user on RADIUS server | rad_SOCIFI |


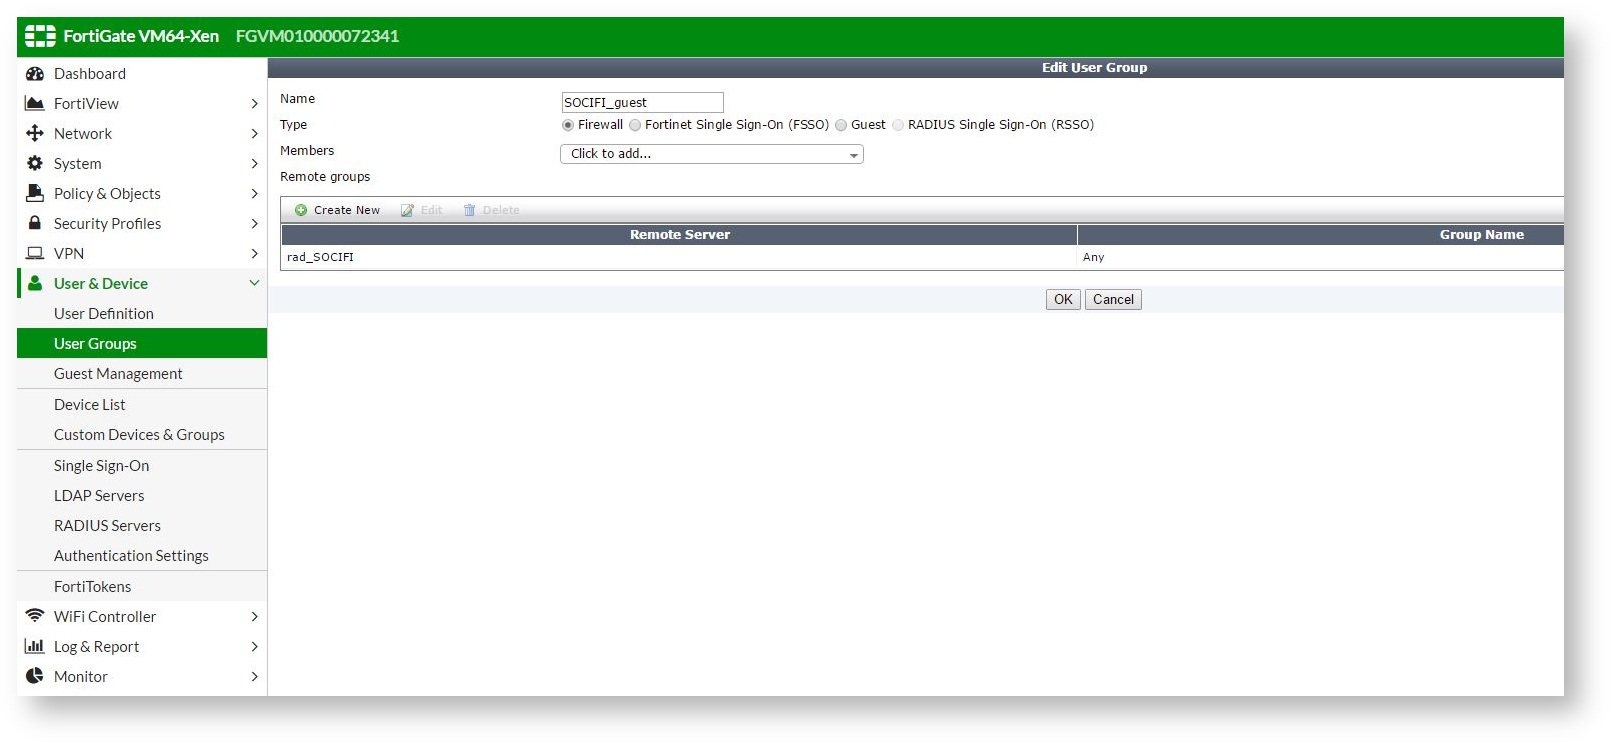
In User&Device / User Groups you need to create an authentication group:
| Name | SOCIFI_guest |
|---|---|
| Type | Firewall |
| Members | <nothing selected> |
| Remote groups | <Create a record with the following parameters> Remote Server = rad_SOCIFI Group Name = any |

Walled Garden
Fortinet doesn't support DNS-Based Walled Garden which seriously affects user experience when working with cloud-based solutions.
To allow the user to get the content thru the Splash Page to connect you need to allow specific IP addresses. To do so, go to Policy & Objects / Addresses. You can create required records based on the table below. You can merge them under one title to make it more clean to understand and allow better management. Specific records for Google, Facebook and Twitter should be created only when you use social networks for authentication. For a basic functionality CDN IP and SOCIFI IP is sufficient.
| CDN_IP | SOCIFI_IP | GOOGLE_IP | FACEBOOK_IP + INSTAGRAM_IP | TWITTER_IP | LINKEDIN_IP | ||||||
|---|---|---|---|---|---|---|---|---|---|---|---|
CDN I CDN II CDN III CDN IV CDN V CDN VI CDN VII CDN VIII CDN IX CDN X CDN XI CDN XII CDN XIII CDN XIV CDN XV CDN XVI CDN XVII CDN XVIII CDN XIX CDN XX CDN XXI CDN XXII CDN XXII CDN XXIII CDN XXIV CDN XXV CDN XXVI CDN XXVII CDN XXVII CDN XXIX CDN XXX CDN XXXI CDN XXXII CDN XXXIII CDN XXXV CDN XXXVI CDN XXXVII CDN XXXVIII CDN XXXIX | 13.32.0.0 / 255.254.0.0 13.35.0.0 / 255.255.0.0 13.54.63.128 / 255.255.255.192 13.59.250.0 / 255.255.255.192 13.224.0.0 / 255.252.0.0 34.195.252.0 / 255.255.255.0 35.162.63.192 / 255.255.255.192 52.15.127.128 / 255.255.255.192 52.46.0.0 / 255.255.192.0 52.52.191.128 / 255.255.255.192 52.57.254.0 / 255.255.255.0 52.66.194.128 / 255.255.255.192 52.78.247.128 / 255.255.255.192 52.84.0.0 / 255.254.0.0 52.199.127.192 / 255.255.255.192 52.212.248.0 / 255.255.255.192 52.220.191.0 / 255.255.255.192 52.222.128.0 / 255.255.128.0 54.182.0.0 / 255.255.0.0 54.192.0.0 / 255.255.0.0 54.230.0.0 / 255.255.0.0 54.233.255.128 / 255.255.255.192 54.239.128.0 / 255.255.192.0 54.239.192.0 / 255.255.224.0 54.240.128.0 / 255.255.192.0 70.132.0.0 / 255.255.192.0 71.152.0.0 / 255.255.128.0 99.84.0.0 / 255.255.0.0 143.204.0.0 / 255.255.0.0 204.246.164.0 / 255.255.252.0 204.246.168.0 / 255.255.252.0 204.246.174.0 / 255.255.254.0 204.246.176.0 / 255.255.240.0 205.251.192.0 / 255.255.224.0 205.251.249.0 / 255.255.255.0 205.251.250.0 / 255.255.254.0 205.251.252.0 / 255.255.254.0 205.251.254.0 / 255.255.255.0 216.137.32.0 / 255.255.224.0 | SOCIFI EU SOCIFI US SOCIFI AP SOCIFI SA SOCIFI EUw SOCIFI USe SOCIFI APs SOCIFI SAe | 54.246.88.74 / 255.255.255.255 54.204.47.201 / 255.255.255.255 54.251.110.178 / 255.255.255.255 54.232.124.137 / 255.255.255.255 52.51.203.246 / 255.255.255.255 52.44.151.156 / 255.255.255.255 52.74.234.61 / 255.255.255.255 54.232.88.133 / 255.255.255.255 | GOOGLE I | 216.239.32.0 / 255.255.224.0 | FACEBOOK I | 31.13.24.0 / 255.255.248.0 31.13.64.0 / 255.255.192.0 45.64.40.0 / 255.255.252.0 66.220.144.0 / 255.255.240.0 69.63.176.0 / 255.255.240.0 69.171.224.0 / 255.255.224.0 74.119.76.0 / 255.255.252.0 103.4.96.0 / 255.255.252.0 129.134.0.0 / 255.255.0.0 157.240.0.0 / 255.255.0.0 173.252.64.0 / 255.255.192.0 179.60.192.0 / 255.255.252.0 185.60.216.0 / 255.255.252.0 204.15.20.0 / 255.255.252.0 | TWITTER I | 69.12.56.0 / 255.255.248.0 103.252.112.0 / 255.255.252.0 104.244.40.0 / 255.255.248.0 185.45.4.0 / 255.255.248.0 188.64.224.0 / 255.255.248.0 192.44.68.0 / 255.255.254.0 192.48.236.0 / 255.255.254.0 192.133.76.0 / 255.255.252.0 199.16.156.0 / 255.255.252.0 199.59.148.0 / 255.255.252.0 199.69.58.0 / 255.255.254.0 199.96.56.0 / 255.255.248.0 202.160.128.0 / 255.255.252.0 192.229.128.0 / 255.255.128.0 93.184.208.0 /255.255.240.0. | LINKEDIN I LINKEDIN II LINKEDIN III LINKEDIN IV LINKEDIN V LINKEDIN VI LINKEDIN VII LINKEDIN VIII LINKEDIN IX LINKEDIN X LINKEDIN XI LINKEDIN XII LINKEDIN XIII LINKEDIN XIV LINKEDIN XV LINKEDIN XVI LINKEDIN XVII LINKEDIN XVIII LINKEDIN XIX | 91.225.248.0 / 255.255.254.0 103.20.94.0 / 255.255.254.0 108.174.0.0 / 255.255.252.0 108.174.4.0 / 255.255.255.0 108.174.8.0 / 255.255.252.0 108.174.12.0 / 255.255.254.0 144.2.0.0 / 255.255.252.0 144.2.192.0 / 255.255.255.0 216.52.16.0 / 255.255.254.0 216.52.18.0 / 255.255.255.0 216.52.20.0 / 255.255.254.0 216.52.22.0 / 255.255.255.0 65.156.227.0 / 255.255.255.0 8.39.53.0 / 255.255.255.0 185.63.144.0 / 255.255.255.0 185.63.147.0 / 255.255.255.0 199.101.161.0 / 255.255.255.0 64.152.25.0 / 255.255.255.0 8.22.161.0 / 255.255.255.0 |
We do not suggest to use Google login and add the GOOGLE_IP to the WalledGarden list. The reason is that some Android based devices may not be redirected to the Captive Portal when the user gets connected to WiFi network.
| Name | CDN I |
|---|---|
| Type | IP/Netmask |
| Subnet / IP range | 52.84.0.0/255.254.0.0 |
| Show in Address List | <checked> |
| Static Route Configuration | <unchecked> |
Example
Each record needs to be created as follows:


Merge these records into the groups based on the type.
| Group Name | CDN_IP |
|---|---|
| Members | CDN I, CDN II, CDN III, CDN IV, CDN V, CDN VI, CDN VII, CDN VIII, CDN IX, CDN X, CDN XI, CDN XII, CDN XIII, CDN XIV, CDN XV, CDN XVI, CDN XVII |
| Show in Addresses List | <checked> |
| Static Route Configuration | <unchecked> |


Wi-Fi Settings
Wi-Fi SSID settings for SOCIFI can be made under WiFi Controller / SSID menu where you need to create a record with the following items. Below, you can see only the records we consider as important for SOCIFI. Feel free to add more parameters based on your experience and requirements. However, keep in mind that any change could affect the service and you should be aware how to revert it to this default settings if any issue is seen.
Interface Name | SOCIFI_freeNet (or another name) |
|---|---|
Type | WiFi SSID |
Traffic Mode | Tunnel to Wireless Controller |
Address IP/Network Mask | <IP Address for the interface> |
Restrict Access | checked only ping |
DHCP Server | <checked> (fill the rest based on the local network requirements) |
WiFi Settings / Security mode | Captive Portal |
Portal Type | Authentication |
Authentication Portal | External => connect-ip.socifi.com |
User Groups | SOCIFI_guest |
Exempt Sources | <nothing> |
Exempt Destination/Services | <nothing> |
Redirect after Captive Portal | Specific URL = http://connect-ip.socifi.com/api/v1/out/session |

IPv4 Policy
For access management you need to create three rules.
The first rule for access to the DNS service to the master subnet.

- The second rule for allowing the access to selected sources for not-authenticated users

- The third rule for allowing access anywhere for authenticated users


As the last step you need to adjust the second Inet_NO_auth rule thru CLI Console. You can find CLI Console e.g. under the admin menu in the upper right corner.
config firewall policy
  edit <policy_id>
    set captive-portal-exempt enable
  end
The adjusted rule looks like this:

Add a new hotspot to SOCIFI Dashboard
Select Fortinet as the equipment and as the Hotspot ID used MAC address each associated AP in the AP settings with this Captive Portal
Step 1: Login to SOCIFI Dashboard
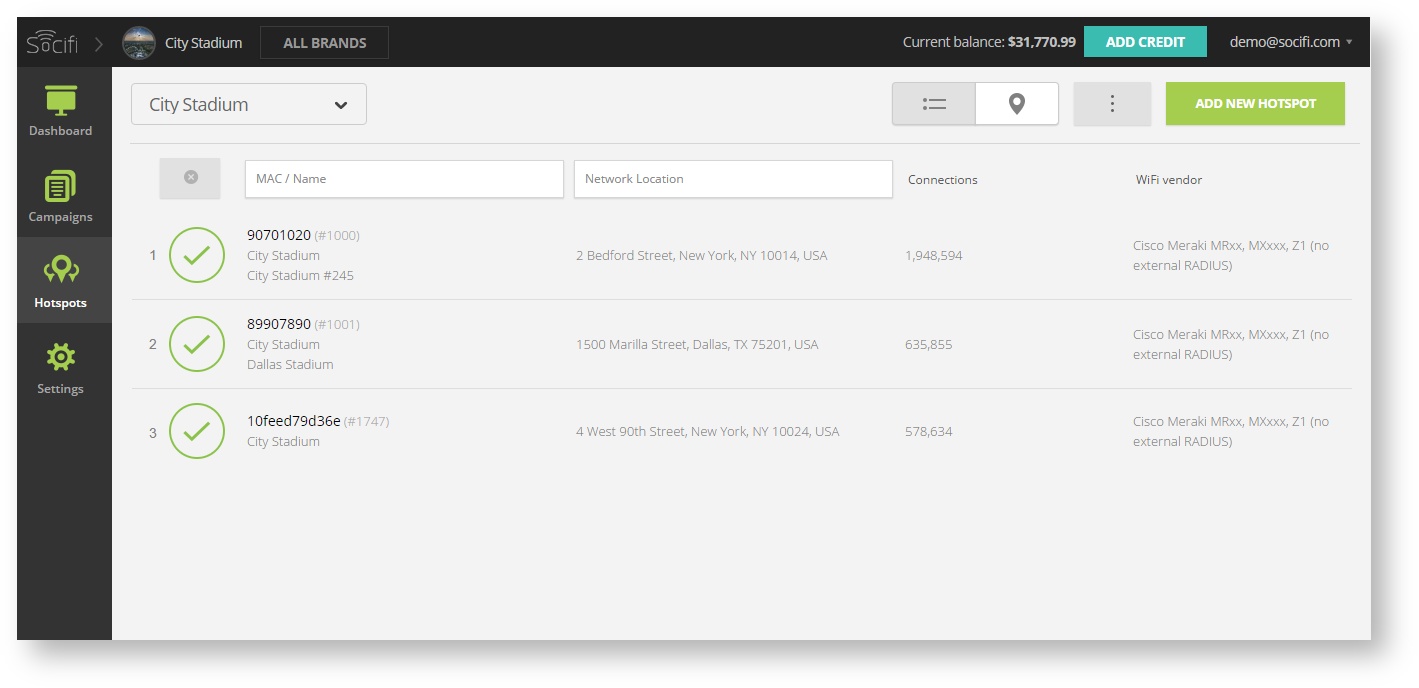
Step 2: Click on the "Hotspots" tab on the left sidebar
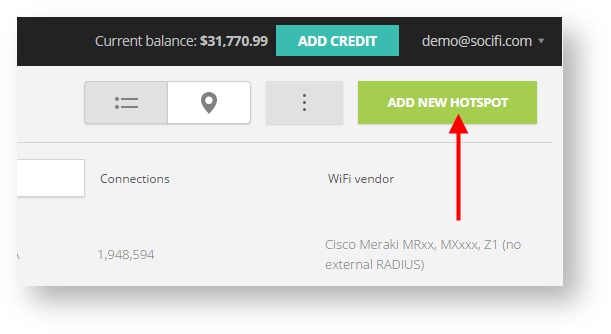
Step 3: Click on the “Add a new hotspot” button located on the top right corner on the screen (pictured below)
Note: A pop-up window will appear (below)
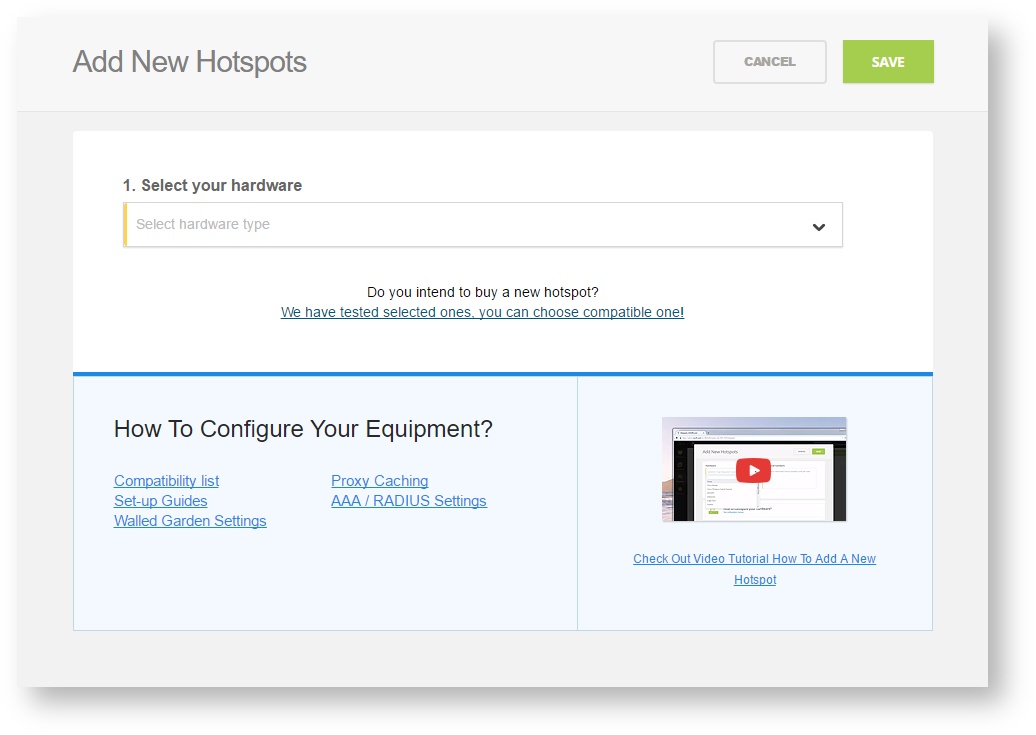
Step 4: Select the Wi-Fi hardware manufacturer from the drop down menu

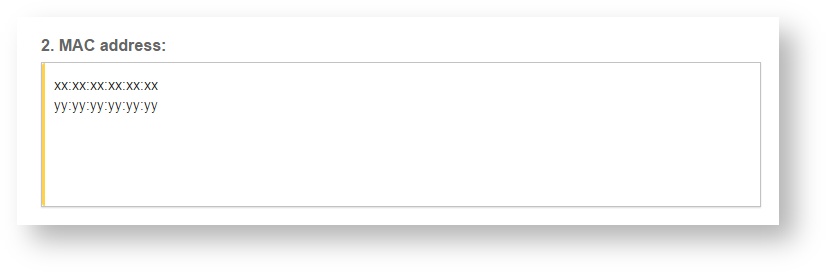
Step 5: Enter the serial number or MAC address (depending on the specific equipment manual) of your equipment. You can add multiple hotspots at once.
Step 6: Set your Network location (this step is essential for correct ad targeting)
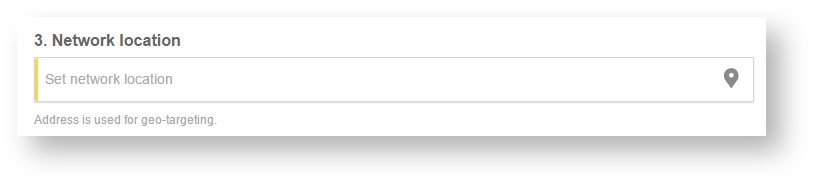
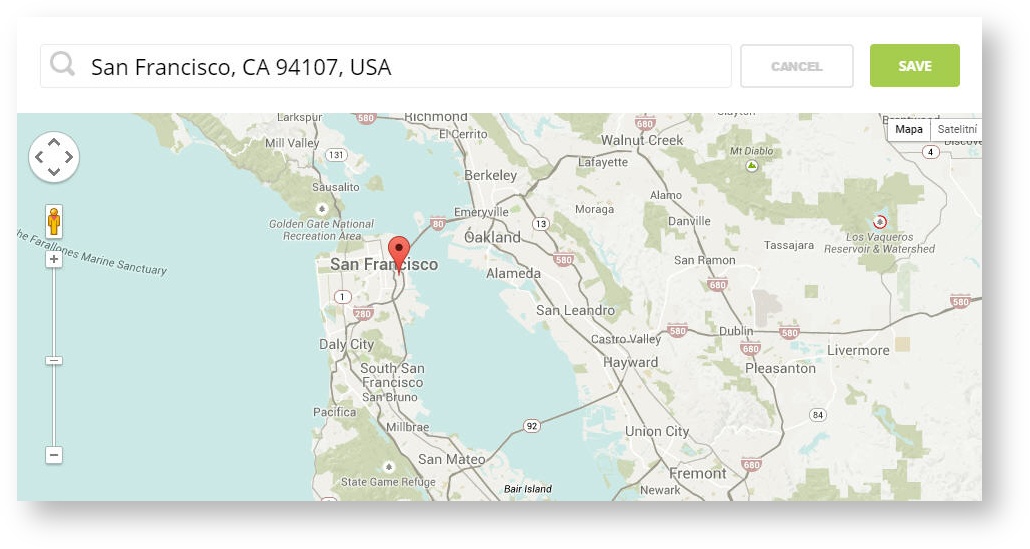
Step 7: In the pop-up window type your location or just move the marker on the map and click on the save button to confirm the selection. This address is used for ad GEO targeting.
Step 7: Click Save

Note: Newly added hotspot are marked as ![]() (Hotspot pending). After the first user connects to the hotspot via SOCIFI, the status will automatically change and appear as
(Hotspot pending). After the first user connects to the hotspot via SOCIFI, the status will automatically change and appear as ![]() (Active) within an hour. Get your first connections to test if it works properly.
(Active) within an hour. Get your first connections to test if it works properly.
