Skip to end of metadata
Go to start of metadata

You are viewing an old version of this page. View the current version.

Compare with Current View Page History

« Previous Version 32 Current »

Router compatibility with DD-WRT and SOCIFI.

Please note that using DD-WRT is at your own risk and we do NOT provide configuration via remote access for DD-WRT powered devices or any other type of support. If you are looking for affordable easy-to-use hardware for end-users please consider Open-Mesh, Mikrotik or SOCIFI Starter Kit.

The DD-WRT 3.x firmware has not been tested yet, please use the 2.x version. How to Install DD-WRT 2.x on a Wireless Router you can find here.


Many routers and access points support the DD-WRT firmware, and this allows you to use SOCIFI. We only recommend coovachilli based DD-WRT. You must replace the original firmware with the DD-WRT firmware. If you don't find your device between the list of supported here you can try community site or forum.

Many devices are supported through the development version (non-stable). Beware the version of the device firmware!

The firmware is available at /betas/<year>/<release_date>/<device_type_fw_version>.
In case you are not sure with your device, see the conversion tab:
http://www.dd-wrt.com/wiki/index.php/Supported_Devices.
 

Download compatible firmware from http://www.dd-wrt.com/site/support/other-downloads > betas > 2014 ... e.g. 06-23-2014-r24461    Firmwares older than June 23rd 2014 are not compatible!

Example for TP-LINK model TL-WR741ND ((star) Buy now)

You can find two files: factory-to-ddwrt.bin and tl-wr741ndv4-webflash.bin.
The first one is needed to rewrite the original TP-LINK firmware to dd-wrt firmware. The second one serves to upgrade your current dd-wrt firmware.

 If you have a supported firmware available and installed, then the following conditions are required:

  • The device is connected to the Internet
  • The WiFi interface is enabled

1. Access to the device through the web interface 

Enter URL to your web browser:192.168.1.1
Default user:admin
Default password:admin
Please note that using DD-WRT is at your own risk and we do NOT provide configuration via remote access for DD-WRT powered devices or any other type of support. If you are looking for affordable easy-to-use hardware for end-users please consider Open-Mesh, Mikrotik or SOCIFI Starter Kit.

2. Basic setup guide

The device is in default configuration DD-WRT after the installation of new firmware and restart.

After the upgrade all ports (WAN included) are parts of the one bridge with DHCP server on. This differs from the default setup of TP-LINK.

It may occur that WAN and LAN port cause a clash of DHCP server DD-WRT and local DHCP server.

(default setup IP 192.168.1.1 with configured DHCP server on in the range 192.168.1.100-192.168.1.255)

Go to Setup tab > Basic setup tab

Connection Type: Automatic Configuration - DHCP

You set and split again WAN and ETH ports by changing the parameter "Connection Type" on the tab Setup/BasicSetup from "disabled" to "Automatic Configuration - DHCP" (to distribute IP address from the parent DHCP server) or "Static IP" (to manual setup).


Please note that using DD-WRT is at your own risk and we do NOT provide configuration via remote access for DD-WRT powered devices or any other type of support. If you are looking for affordable easy-to-use hardware for end-users please consider Open-Mesh, Mikrotik or SOCIFI Starter Kit.

3. Wireless interface configuration

Go to: Wireless tab > Basic Settings tab
make sure that the WiFi interface is enabled
 

Wireless Physical Interface ath0


Wireless Mode:AP
Wireless Network Mode:Mixed
Wireless Network Name:Your Wireless Network SSID (name)
Wireless SSID Broadcast:Enable

and SAVE

Go to Wireless tab > Wireless Security tab

Security Mode: Disabled

and SAVE

Please note that using DD-WRT is at your own risk and we do NOT provide configuration via remote access for DD-WRT powered devices or any other type of support. If you are looking for affordable easy-to-use hardware for end-users please consider Open-Mesh, Mikrotik or SOCIFI Starter Kit.

4. Hotspot configuration

Some versions of DD-WRT suffer from firmware error causing not rewriting UAM Domains from the Chillispot setting. Due to this fact, you enter these domains also to the hotspotsystem.com setting.

Go to Services tab > Hotspot tab

Hotspot Portal section / Hotspot System.com

Hotspotsystem.com: Enable      (this is temporarily ON and must be disabled when all done - bypassing the firmware error. Follow the instructions below)

Special settings: Enable

UAM Allowed:

UAM Domains:

If you are customer with White Label solution, please add your custom domain (for example mycustomdomain.com) to the Walled Garden list.

socifi.com facebook.com akamaihd.net akamai.net edgecastcdn.net twitter.com twimg.com fastly.net li-cdn.net cloudfront.net fbcdn.net instagram.com cdninstagram.com linkedin.com licdn.com
 Want to Allow Google+ login ?

The new Allow login through social networks does not include the Google login. The reason is that some Android based devices are not redirected to the Captive Portal when the user gets connected to WiFi network. In case you'd like to add it you need to do following:

  1. Check if your hotspot allows DNS names in the Walled garden. Some hotspots can use IP addresses only. See: Why DNS-based Walled Garden (and not IP-based)
  2. Allow Google+ login: Settings > Brand > Authentication > Allow login through social networks > Set on Allow Google login
  3. Add these walled garden domain into existing list:

Google+ Login DNS's

Please adopt same format your Walled garden is already using e.g. with or without the asterisk, separated by comma or space etc.

 For Cisco Meraki, Ruckus, Xirrus
*.googleapis.com
*.googleusercontent.com
*.gstatic.com
*.accounts.youtube.com
*.apis.google.com
*.accounts.google.com
*.l.google.com

The local accounts.google.XX domain must be added into the Walled Garden list. For example accounts.google.co.uk for United Kingdom, accounts.google.com.sg for Singapore, accounts.google.de for Germany etc. Google domains list you can find at https://ipfs.io/ipfs/QmXoypizjW3WknFiJnKLwHCnL72vedxjQkDDP1mXWo6uco/wiki/List_of_Google_domains.html

 For Open Mesh
googleapis.com,googleusercontent.com,gstatic.com,accounts.youtube.com,apis.google.com,accounts.google.com,l.google.com

The local accounts.google.XX domain must be added into the Walled Garden list. For example accounts.google.co.uk for United Kingdom, accounts.google.com.sg for Singapore, accounts.google.de for Germany etc. Google domains list you can find at https://ipfs.io/ipfs/QmXoypizjW3WknFiJnKLwHCnL72vedxjQkDDP1mXWo6uco/wiki/List_of_Google_domains.html

 For Mikrotik
/ip hotspot walled-garden
add dst-host=*.googleapis.com
add dst-host=*.googleusercontent.com
add dst-host=*.gstatic.com
add dst-host=*.accounts.youtube.com
add dst-host=*.apis.google.com
add dst-host=*.accounts.google.com
add dst-host=*.l.google.com
add dst-host=accounts.google.com

The local accounts.google.XX domain must be added into the Walled Garden list. For example accounts.google.co.uk for United Kingdom, accounts.google.com.sg for Singapore, accounts.google.de for Germany etc. Google domains list you can find at https://ipfs.io/ipfs/QmXoypizjW3WknFiJnKLwHCnL72vedxjQkDDP1mXWo6uco/wiki/List_of_Google_domains.html

 For DD-WRT
googleapis.com googleusercontent.com gstatic.com accounts.youtube.com apis.google.com accounts.google.com l.google.com

The local accounts.google.XX domain must be added into the Walled Garden list. For example accounts.google.co.uk for United Kingdom, accounts.google.com.sg for Singapore, accounts.google.de for Germany etc. Google domains list you can find at https://ipfs.io/ipfs/QmXoypizjW3WknFiJnKLwHCnL72vedxjQkDDP1mXWo6uco/wiki/List_of_Google_domains.html

Related pages:

The Splash Page is not triggered when Android devices connect to WiFi


and SAVE

Now disable the hotspotsystem.com settings you've just adjusted.

Hotspotsystem.com: Disable

and SAVE again

Configure chillispot now:

Hotspot Portal section / Chillispot

Chillispot:Enable
DHCP Interface:LAN
Hotspot Network:192.168.182.0/24
Primary Radius Server IP/DNS:52.209.184.212 (example for Europe)
Backup Radius Server IP/DNS:52.50.155.202 (example for Europe)


We recommend to use this set of RADIUS servers:


 List of RADIUS according to your location:
 For North America

RADIUS Server 1

rad-1-use-1.socifi.com or IP address: 52.7.148.174, Radius shared secret: socifi

RADIUS Server 2

rad-2-use-1.socifi.com or IP address: 52.55.217.23, Radius shared secret: socifi

 For Europe and Africa

RADIUS Server 1

rad-1-euw-1.socifi.com or IP address: 52.209.184.212, Radius shared secret: socifi

RADIUS Server 2

rad-2-euw-1.socifi.com or IP address: 52.50.155.202, Radius shared secret: socifi

 For Asia-Pacific

RADIUS Server 1

rad-1-euw-1.socifi.com or IP address: 52.209.184.212, Radius shared secret: socifi

RADIUS Server 2

rad-2-euw-1.socifi.com or IP address: 52.50.155.202, Radius shared secret: socifi

In order to have the Radius communication working fine, the IP addresses (above) and the ports 1812 Auth and 1813 Acc must be accessible.

DNS IP:8.8.8.8 (it's recommended use DNS server address of your internet service provider)
Redirect URL:http://connect.socifi.com
Shared Key:socifi (case sensitive)
Radius NAS ID:dd-wrt
UAM Secret:
UAM Any DNS:0
UAM Allowed:


UAM Domains:

If you are customer with White Label solution, please add your custom domain (for example mycustomdomain.com) to the Walled Garden list.

socifi.com facebook.com akamaihd.net akamai.net edgecastcdn.net twitter.com twimg.com fastly.net li-cdn.net cloudfront.net fbcdn.net instagram.com cdninstagram.com linkedin.com licdn.com
 Want to Allow Google+ login ?

The new Allow login through social networks does not include the Google login. The reason is that some Android based devices are not redirected to the Captive Portal when the user gets connected to WiFi network. In case you'd like to add it you need to do following:

  1. Check if your hotspot allows DNS names in the Walled garden. Some hotspots can use IP addresses only. See: Why DNS-based Walled Garden (and not IP-based)
  2. Allow Google+ login: Settings > Brand > Authentication > Allow login through social networks > Set on Allow Google login
  3. Add these walled garden domain into existing list:

Google+ Login DNS's

Please adopt same format your Walled garden is already using e.g. with or without the asterisk, separated by comma or space etc.

 For Cisco Meraki, Ruckus, Xirrus
*.googleapis.com
*.googleusercontent.com
*.gstatic.com
*.accounts.youtube.com
*.apis.google.com
*.accounts.google.com
*.l.google.com

The local accounts.google.XX domain must be added into the Walled Garden list. For example accounts.google.co.uk for United Kingdom, accounts.google.com.sg for Singapore, accounts.google.de for Germany etc. Google domains list you can find at https://ipfs.io/ipfs/QmXoypizjW3WknFiJnKLwHCnL72vedxjQkDDP1mXWo6uco/wiki/List_of_Google_domains.html

 For Open Mesh
googleapis.com,googleusercontent.com,gstatic.com,accounts.youtube.com,apis.google.com,accounts.google.com,l.google.com

The local accounts.google.XX domain must be added into the Walled Garden list. For example accounts.google.co.uk for United Kingdom, accounts.google.com.sg for Singapore, accounts.google.de for Germany etc. Google domains list you can find at https://ipfs.io/ipfs/QmXoypizjW3WknFiJnKLwHCnL72vedxjQkDDP1mXWo6uco/wiki/List_of_Google_domains.html

 For Mikrotik
/ip hotspot walled-garden
add dst-host=*.googleapis.com
add dst-host=*.googleusercontent.com
add dst-host=*.gstatic.com
add dst-host=*.accounts.youtube.com
add dst-host=*.apis.google.com
add dst-host=*.accounts.google.com
add dst-host=*.l.google.com
add dst-host=accounts.google.com

The local accounts.google.XX domain must be added into the Walled Garden list. For example accounts.google.co.uk for United Kingdom, accounts.google.com.sg for Singapore, accounts.google.de for Germany etc. Google domains list you can find at https://ipfs.io/ipfs/QmXoypizjW3WknFiJnKLwHCnL72vedxjQkDDP1mXWo6uco/wiki/List_of_Google_domains.html

 For DD-WRT
googleapis.com googleusercontent.com gstatic.com accounts.youtube.com apis.google.com accounts.google.com l.google.com

The local accounts.google.XX domain must be added into the Walled Garden list. For example accounts.google.co.uk for United Kingdom, accounts.google.com.sg for Singapore, accounts.google.de for Germany etc. Google domains list you can find at https://ipfs.io/ipfs/QmXoypizjW3WknFiJnKLwHCnL72vedxjQkDDP1mXWo6uco/wiki/List_of_Google_domains.html

Related pages:

The Splash Page is not triggered when Android devices connect to WiFi


MACauth:Disable
802.1X Authentication (EAP):Disable

and Save & Apply Settings

Power OFF/ON hardware.

Please note that using DD-WRT is at your own risk and we do NOT provide configuration via remote access for DD-WRT powered devices or any other type of support. If you are looking for affordable easy-to-use hardware for end-users please consider Open-Mesh, Mikrotik or SOCIFI Starter Kit.

5. Configure Time Settings

  1. Navigate to Setup > Basic Setup
  2. Under Time Settings, set:
    • NTP Client = Enable
    • Time Zone = your city (You might have to do some research to pick a city in the same timezone if yours isn't listed.)
    • Server IP/Name = time.nist.gov (or another preferred time server)
  3. Save and Apply Settings

6. Add device at SOCIFI Dashboard

You will need to add MAC addresses of your router.


As equipment under the Hardware setting select the DD-WRT.


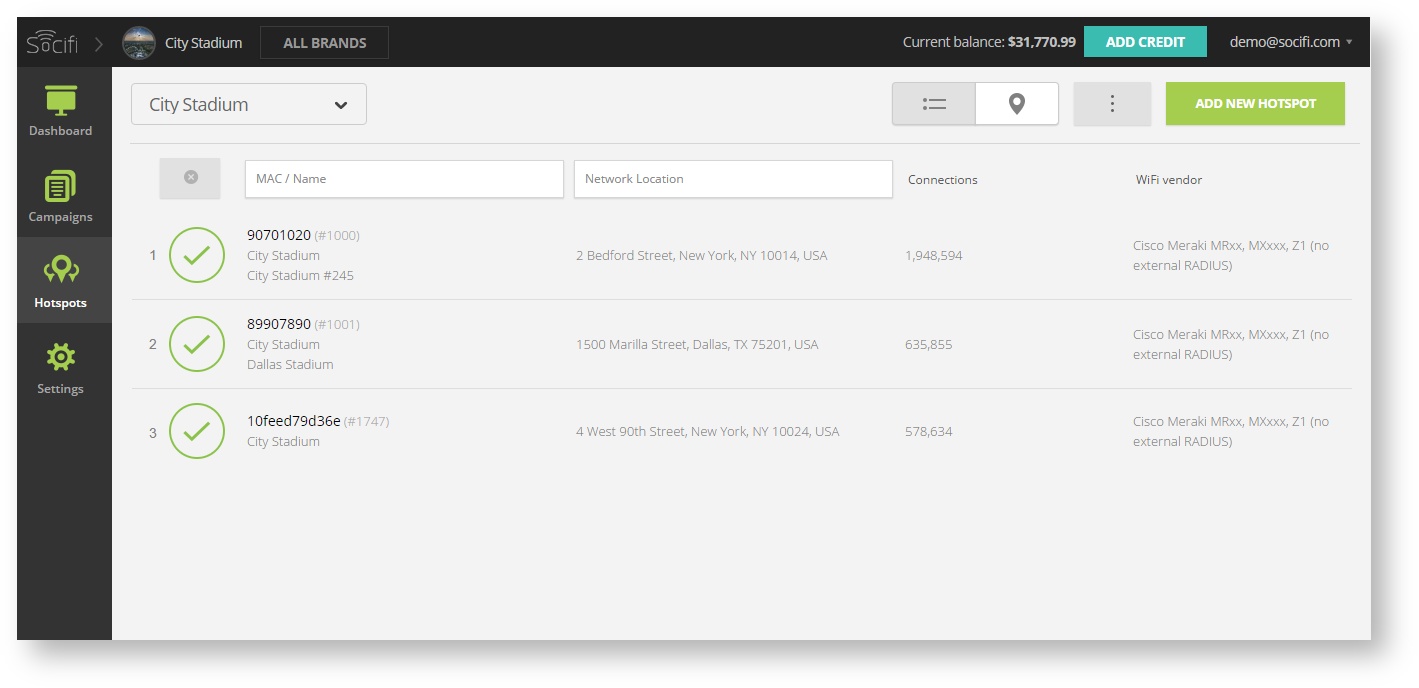
Step 1: Login to SOCIFI Dashboard

Step 2: Click on the "Hotspots" tab on the left sidebar

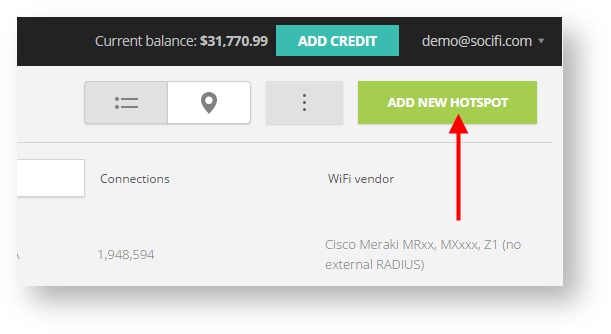
Step 3: Click on the “Add a new hotspot” button located on the top right corner on the screen (pictured below)

Note: A pop-up window will appear (below)

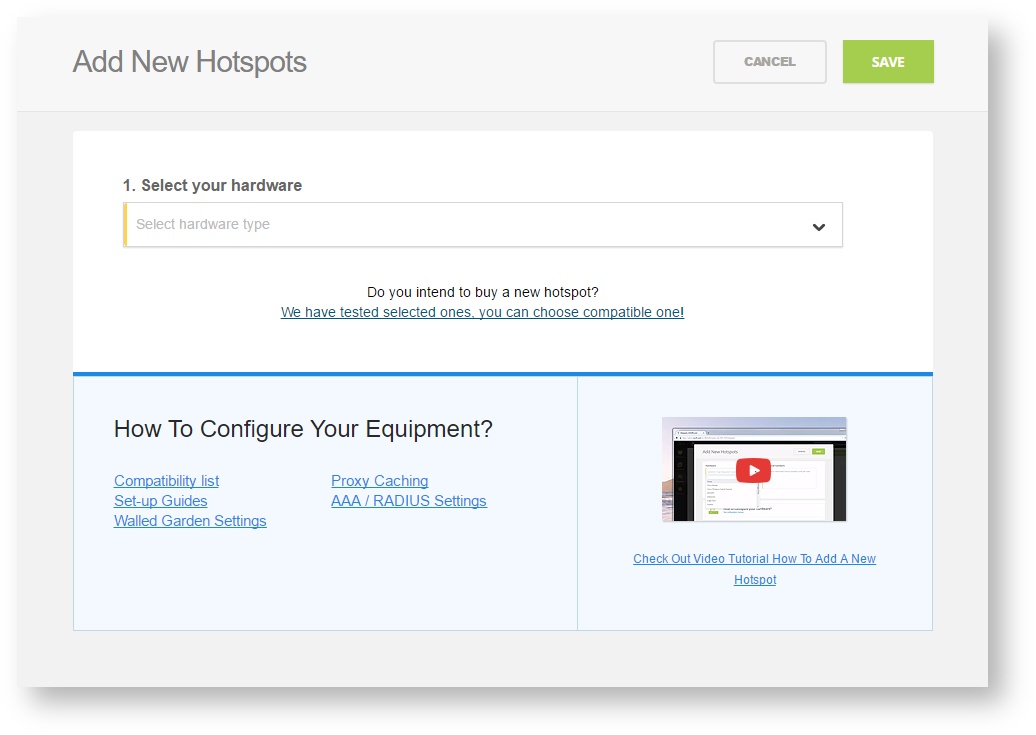
Step 4: Select the Wi-Fi hardware manufacturer from the drop down menu

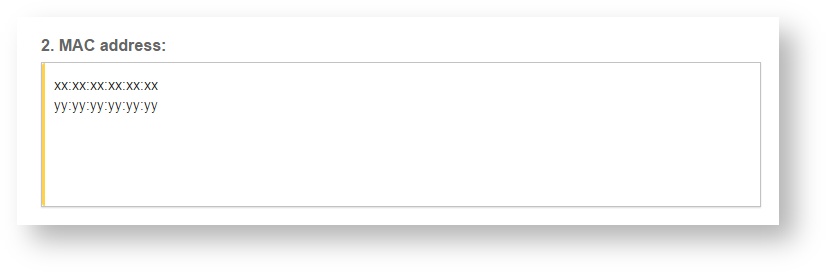
Step 5: Enter the serial number or MAC address (depending on the specific equipment manual) of your equipment. You can add multiple hotspots at once.

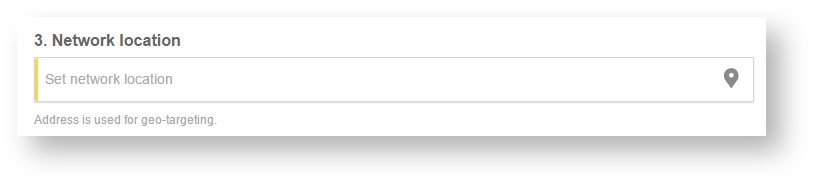
Step 6: Set your Network location (this step is essential for correct ad targeting)

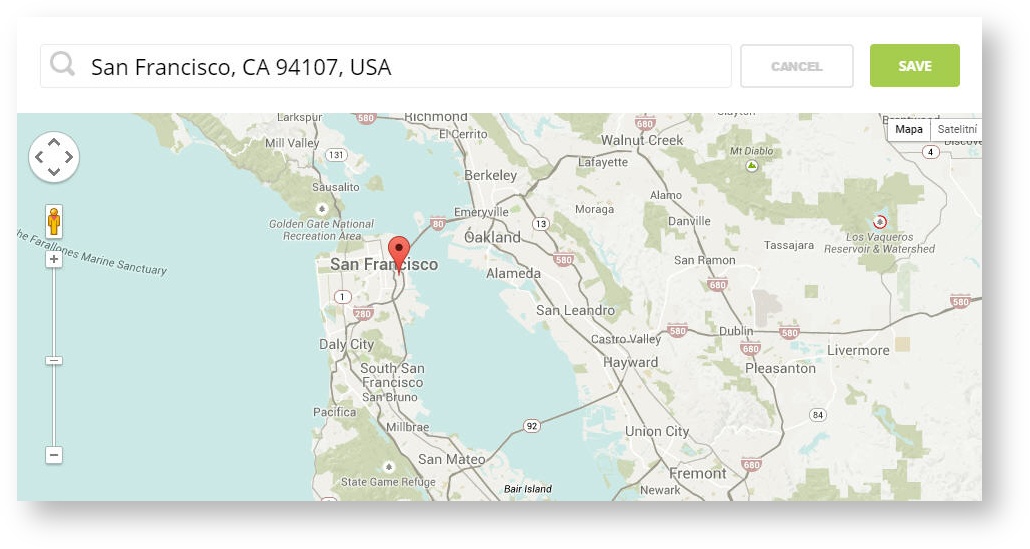
Step 7: In the pop-up window type your location or just move the marker on the map and click on the save button to confirm the selection. This address is used for ad GEO targeting.

Step 7: Click Save

Note: Newly added hotspot are marked as  (Hotspot pending). After the first user connects to the hotspot via SOCIFI, the status will automatically change and appear as  (Active) within an hour. Get your first connections to test if it works properly. 


Please note that using DD-WRT is at your own risk and we do NOT provide configuration via remote access for DD-WRT powered devices or any other type of support. If you are looking for affordable easy-to-use hardware for end-users please consider Open-Mesh, Mikrotik or SOCIFI Starter Kit.
  • No labels