Mikrotik RouterOS on an x86 machine (virtual)

1. Getting started with WinBox

Launch WinBox app. After selecting “...” button wait a while to get MAC Addresses list. Select requested address (not IP if you are in a different net). Don’t type any password.

Confirm the action by pressing Connect button.

2. Setting SNTP client

After the next reboot: System, Reboot configure SNTP client (time):
System > SNTP Client


Enabled: Checked
Mode: Unicast
Primary NTP Server: 0.north-america.pool.ntp.org
Secondary NTP Server: 1.north-america.pool.ntp.org


Please set servers that are as close to your location as possible. You can find NTP list here: http://www.pool.ntp.org/en/


Enable the correct time zone System > Clock > Time Zone Name:
America/Montreal (or according to your location):

The time is automatically synchronized after the correct termination of LAN configuration.

3. Setting up DHCP client

Run DHCP client on ether1 interface: IP > DHCP Client > +

New DHCP Client DHCP Client tab
Interface: ether1
OK


Result example:

4. Adding the bridge

Add the bridge to all ports except ether1 and SFP1:
Bridge > Bridge tab > +

New Interface: General tab
Name:bridge-HS
OK

5. Adding the bridge ports

Bridge > Ports tab > +

New Bridge Port: General tab
Interface: ether2 gradually to a ether10 and wlan1
all on Bridge:bridge-HS

6. Definition of the SOCIFI hotspot

Run the definition of hotspot:
IP > Hotspot > Servers TabHotspot Setup

bridge-HS Instead of addresses listed in this figure, we recommend a different address, than the address of the interface (bridge-HS), eg: 192.168.88.1/24, see the notes at the end of the manual.

The number of IP addresses should submit their license (L4 = 200 addresses). See notes at the end of the manual.

Hotspot Setup:

  1. HotSpot Interface: bridge-HS
  2. Local Address of Network: 192.168.88.1/24
  3. Address Pool of Network: 192.168.88.20 - 192.168.88.219
  4. Select Certificate: none
  5. IP Address of SMTP Server: 0.0.0.0
  6. DNS Servers: 192.168.88.1 / 8.8.8.8 / 8.8.4.4
    First DNS server address must be the interface address!!
  7. DNS Name: hotspot.socifi.com (required)
  8. Name of Local HotSpot User: user


7. Removing shared user

Remove Shared User (default = 1):
IP > Hotspot
 User ProfilesDefault , General Tab

Shared Users: clear
OK

Addresses per MAC = 1 (default = 2 )     Note: it's a bit tricky, the field shows normally just grey color, no values
IP > Hotspot > Server hotspot1

Addresses per MAC: 1
OK


Change the method of authentication:
IP HotSpot Server Profiles select hsprof1

Hotspot Server Profile <hsprof1> Login Tab
HTTP PAP: checked

Use RADIUS: Checked
Default Domain:
Location ID:
Location Name:
Mac Format: XX:XX:XX:XX:XX:XX
Accounting: Checked
Interim Update:
Nas Port Type: 19 (wireless-802.11)

Now define a list of allowed servers, IP > Hotspot Walled Garden:

Create a script WalledGarden script: System > Scripts +
Name: WalledGarden


Copy & paste following script: 

If you are customer with White Label solution, please add your custom domain (for example mycustomdomain.com) to the Walled Garden list.

add dst-host=*. mycustomdomain.com
/ip hotspot walled-garden
add dst-host=*.socifi.com
add dst-host=*.facebook.com
add dst-host=*.akamaihd.net
add dst-host=*.akamai.net
add dst-host=*.edgecastcdn.net
add dst-host=*.edgekey.net
add dst-host=*.akamaiedge.net
add dst-host=*.twitter.com
add dst-host=twitter.com
add dst-host=*.twimg.com
add dst-host=*.fastly.net
add dst-host=*.li-cdn.net
add dst-host=*.cloudfront.net
add dst-host=facebook.com
add dst-host=*.fbcdn.net
add dst-host=*.instagram.com
add dst-host=instagram.com
add dst-host=*.cdninstagram.com
add dst-host=*.linkedin.com
add dst-host=linkedin.com
add dst-host=*.licdn.com
 Want to Allow Google+ login ?

The new Allow login through social networks does not include the Google login. The reason is that some Android based devices are not redirected to the Captive Portal when the user gets connected to WiFi network. In case you'd like to add it you need to do following:

  1. Check if your hotspot allows DNS names in the Walled garden. Some hotspots can use IP addresses only. See: Why DNS-based Walled Garden (and not IP-based)
  2. Allow Google+ login: Settings > Brand > Authentication > Allow login through social networks > Set on Allow Google login
  3. Add these walled garden domain into existing list:

Google+ Login DNS's

Please adopt same format your Walled garden is already using e.g. with or without the asterisk, separated by comma or space etc.

 For Cisco Meraki, Ruckus, Xirrus
*.googleapis.com
*.googleusercontent.com
*.gstatic.com
*.accounts.youtube.com
*.apis.google.com
*.accounts.google.com
*.l.google.com

The local accounts.google.XX domain must be added into the Walled Garden list. For example accounts.google.co.uk for United Kingdom, accounts.google.com.sg for Singapore, accounts.google.de for Germany etc. Google domains list you can find at https://ipfs.io/ipfs/QmXoypizjW3WknFiJnKLwHCnL72vedxjQkDDP1mXWo6uco/wiki/List_of_Google_domains.html

 For Open Mesh
googleapis.com,googleusercontent.com,gstatic.com,accounts.youtube.com,apis.google.com,accounts.google.com,l.google.com

The local accounts.google.XX domain must be added into the Walled Garden list. For example accounts.google.co.uk for United Kingdom, accounts.google.com.sg for Singapore, accounts.google.de for Germany etc. Google domains list you can find at https://ipfs.io/ipfs/QmXoypizjW3WknFiJnKLwHCnL72vedxjQkDDP1mXWo6uco/wiki/List_of_Google_domains.html

 For Mikrotik
/ip hotspot walled-garden
add dst-host=*.googleapis.com
add dst-host=*.googleusercontent.com
add dst-host=*.gstatic.com
add dst-host=*.accounts.youtube.com
add dst-host=*.apis.google.com
add dst-host=*.accounts.google.com
add dst-host=*.l.google.com
add dst-host=accounts.google.com

The local accounts.google.XX domain must be added into the Walled Garden list. For example accounts.google.co.uk for United Kingdom, accounts.google.com.sg for Singapore, accounts.google.de for Germany etc. Google domains list you can find at https://ipfs.io/ipfs/QmXoypizjW3WknFiJnKLwHCnL72vedxjQkDDP1mXWo6uco/wiki/List_of_Google_domains.html

 For DD-WRT
googleapis.com googleusercontent.com gstatic.com accounts.youtube.com apis.google.com accounts.google.com l.google.com

The local accounts.google.XX domain must be added into the Walled Garden list. For example accounts.google.co.uk for United Kingdom, accounts.google.com.sg for Singapore, accounts.google.de for Germany etc. Google domains list you can find at https://ipfs.io/ipfs/QmXoypizjW3WknFiJnKLwHCnL72vedxjQkDDP1mXWo6uco/wiki/List_of_Google_domains.html

Related pages:

The Splash Page is not triggered when Android devices connect to WiFi

facebook.com and twitter.com       (Yes, twice. Once with and once without the asterisk)


The result is a list of servers:

The list of Walled Garden servers is changed from time to time, you may be asked to change its contents. The current list is always in this documentation. Before you run the script again (even if with new content), first you must delete old Walled Garden server list (otherwise the list would be permanently duplicated).

8. Creating a definition for hotspot login

Script definition for content of hotspot / login.html

We generate a hotspot / login.html file the same way: System > Scripts > +
Name: ReplaceLogin


Click Apply and than run script: Run Script (change takes the effect by changing the date and time of file: File hotspot/login.html). Copy & paste following script:

:local mac [system routerboard get serial-number];
:if (  [system routerboard get routerboard] = yes ) do {:set mac [system routerboard get serial-number]} else { :set mac [interface ethernet get ether1 mac-address]};

/file set "hotspot/login.html" contents="<html>
<head>
<meta http-equiv=\"refresh\" content=\"0; url=http://connect.socifi.com/?rad=yes&serial=$mac&client_mac=\$(mac)&client_ip=\$(ip)&userurl=\$(link-orig)&login_url=\$(link-login-only)\" />
<meta http-equiv=\"pragma\" content=\"no-cache\">
<meta http-equiv=\"expires\" content=\"-1\">
</head>
</html>"

 9. Changing the default password

Change the default password (defaultly blank) on hard and complex one:
System > Password
(at least 8 characters, uppercase and lowercase letters and digits)

 10. Configuring the RADIUS server

Add primary radius server (RADIUS Server 1):
Radius + General tab

Servis
hotspot: checked
Called ID :
Domain:
Address: rad-1-euw-1.socifi.com (for example)

We recommend to use this set of RADIUS servers:


RADIUS Server 1

rad-1-use-1.socifi.com or IP address: 52.7.148.174, Radius shared secret: socifi

RADIUS Server 2

rad-2-use-1.socifi.com or IP address: 52.55.217.23, Radius shared secret: socifi

 For Europe and Africa

RADIUS Server 1

rad-1-euw-1.socifi.com or IP address: 52.209.184.212, Radius shared secret: socifi

RADIUS Server 2

rad-2-euw-1.socifi.com or IP address: 52.50.155.202, Radius shared secret: socifi

 For Asia-Pacific

RADIUS Server 1

rad-1-euw-1.socifi.com or IP address: 52.209.184.212, Radius shared secret: socifi

RADIUS Server 2

rad-2-euw-1.socifi.com or IP address: 52.50.155.202, Radius shared secret: socifi

In order to have the Radius communication working fine, the IP addresses (above) and the ports 1812 Auth and 1813 Acc must be accessible.


Secret: 
socifi
Authentication port: 1812
Accounting port: 1813
Timeout: 300 ms
Acccountig Backup: unchecked
Src. Address:

Add secondary radius server (RADIUS Server 2):
Radius + General tab

Servis
hotspot: checked
Called ID :
Domain:
Address: rad-2-euw-1.socifi.com (for example)

We recommend to use this set of RADIUS servers:


 List of RADIUS according to your location:
 For North America

RADIUS Server 1

rad-1-use-1.socifi.com or IP address: 52.7.148.174, Radius shared secret: socifi

RADIUS Server 2

rad-2-use-1.socifi.com or IP address: 52.55.217.23, Radius shared secret: socifi

 For Europe and Africa

RADIUS Server 1

rad-1-euw-1.socifi.com or IP address: 52.209.184.212, Radius shared secret: socifi

RADIUS Server 2

rad-2-euw-1.socifi.com or IP address: 52.50.155.202, Radius shared secret: socifi

 For Asia-Pacific

RADIUS Server 1

rad-1-euw-1.socifi.com or IP address: 52.209.184.212, Radius shared secret: socifi

RADIUS Server 2

rad-2-euw-1.socifi.com or IP address: 52.50.155.202, Radius shared secret: socifi

In order to have the Radius communication working fine, the IP addresses (above) and the ports 1812 Auth and 1813 Acc must be accessible.

Secret: socifi
Authentication port: 1812
Accounting port: 1813
Timeout: 300 ms
Acccountig Backup: unchecked
Src. Address:

11. Safety in the end, but not the last

In conclusion, we recommend modifying the firewall so no one (except you :) could get into management of MikroTik: IP > Firewall > +

New Firewall Rule> General tab
chain: input
In. Interface: unselect bridge-HS


New Firewall Rule> Action tab
Action: drop

New rule must be at the last line:

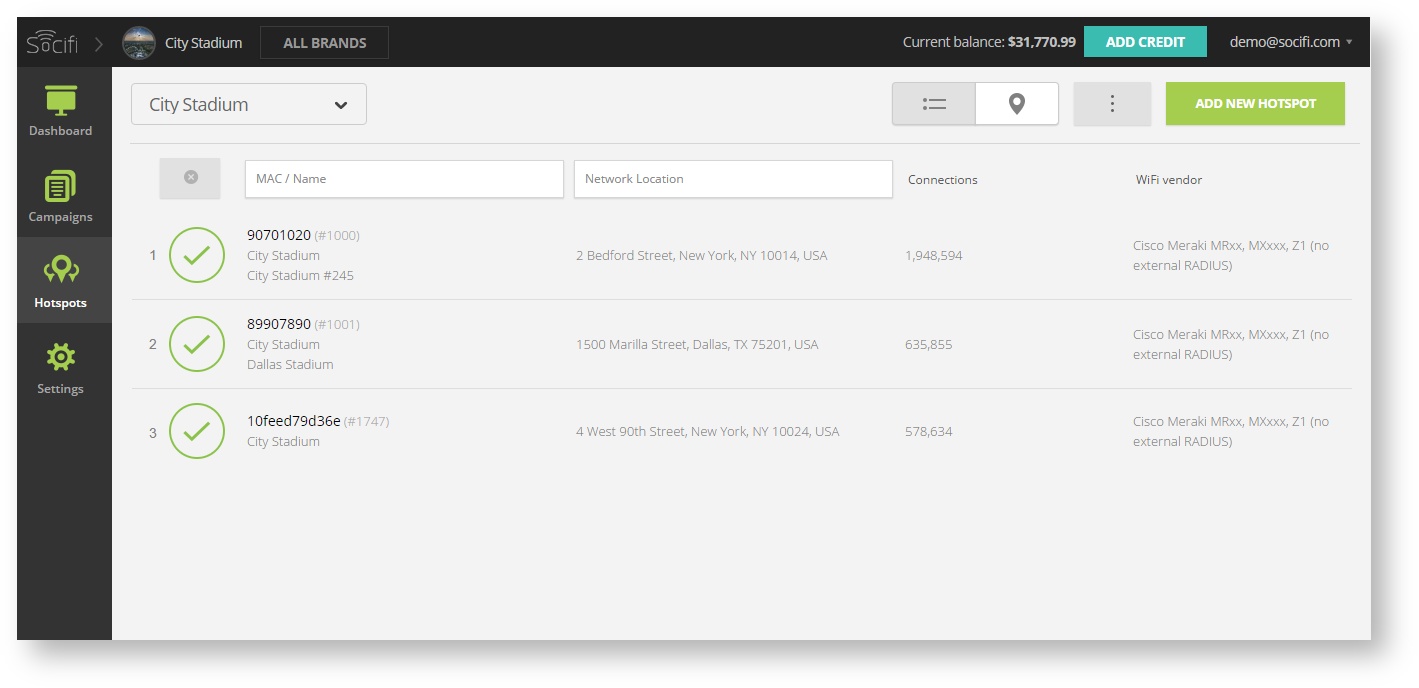
 12. Connecting your MikroTik to SOCIFI Dashboard

Step 1: Login to SOCIFI Dashboard

Step 2: Click on the "Hotspots" tab on the left sidebar

Step 3: Click on the “Add a new hotspot” button located on the top right corner on the screen (pictured below)

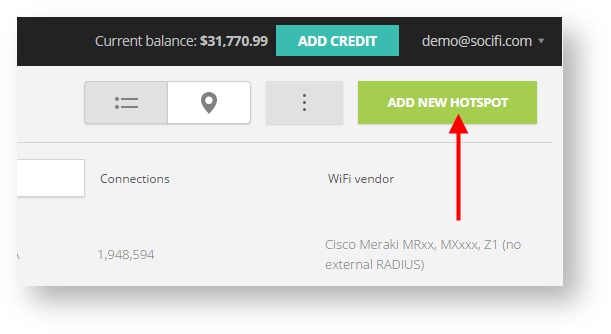
Note: A pop-up window will appear (below)

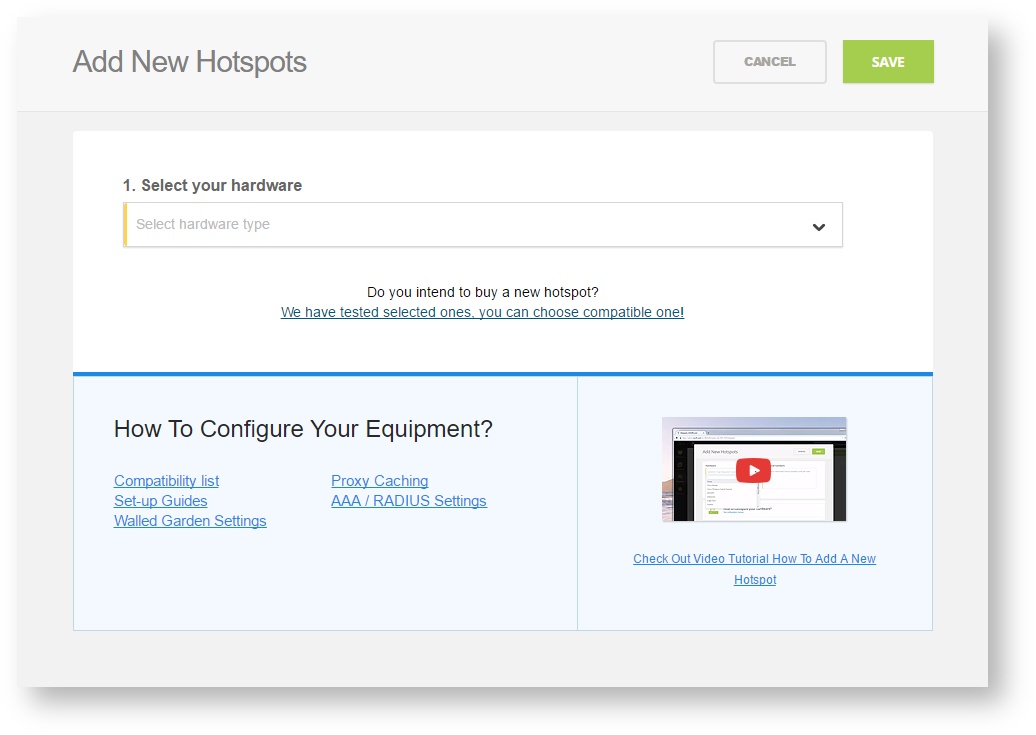
Step 4: Select the Wi-Fi hardware manufacturer from the drop down menu

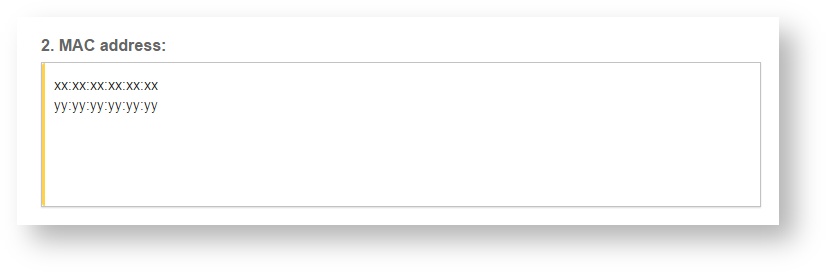
Step 5: Enter the serial number or MAC address (depending on the specific equipment manual) of your equipment. You can add multiple hotspots at once.

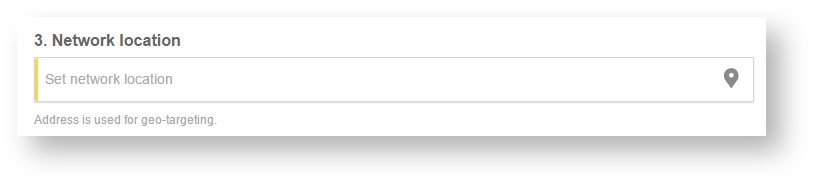
Step 6: Set your Network location (this step is essential for correct ad targeting)

Step 7: In the pop-up window type your location or just move the marker on the map and click on the save button to confirm the selection. This address is used for ad GEO targeting.
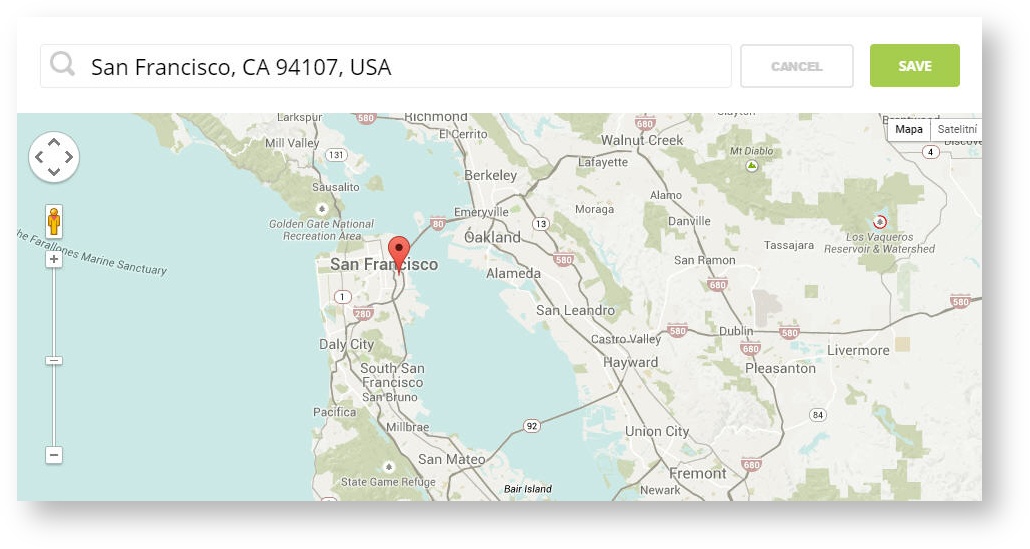
Step 7: Click Save

Note: Newly added hotspot are marked as  (Hotspot pending). After the first user connects to the hotspot via SOCIFI, the status will automatically change and appear as  (Active) within an hour. Get your first connections to test if it works properly.