ARUBA 7005 - Mobility Controller + ARUBA AP

Tested versions:
| Model | Type | Firmware version | Description | Limits |
|---|---|---|---|---|
| Aruba 7005 | controller | 6.4.2.12 | Can be used for: Aruba Controller 6000 | speed control upon request |
Intro: We assume the Wifi part is already up and running and we need to complete the SOCIFI part only.
1. Walled Garden
At first we need to set the ACL to enable access for authentication processes. Go to Configuration menu ADVANCED SERVICES > Stateful Firewall > Destination and create new group SOCIFI_WG
Settings
| IP Version | IPv4 |
|---|---|
| Destination Name | SOCIFI_WG |
| Destination Description | SOCIFI_WalledGarden |
| Invert | unchecked |
then let's add DNS entries type "name" using this list:
Enter following Walled garden ranges:
If you are a customer with the White Label solution, please add your custom domain (for example *.mycustomdomain.com) to the Walled Garden list.
*.socifi.com
*.facebook.com
*.akamaihd.net
*.akamai.net
*.edgecastcdn.net
twitter.com
*.twitter.com
*.twimg.com
*.fastly.net
*.li-cdn.net
*.cloudfront.net
facebook.com
*.fbcdn.net
*.instagram.com
*.cdninstagram.com
instagram.com
*.linkedin.com
*.licdn.com
linkedin.com
facebook.com and twitter.com (Yes, twice. Once with and once without the asterisk)
Pages related to Walled Garden issues

2. RADIUS (AAA) servers
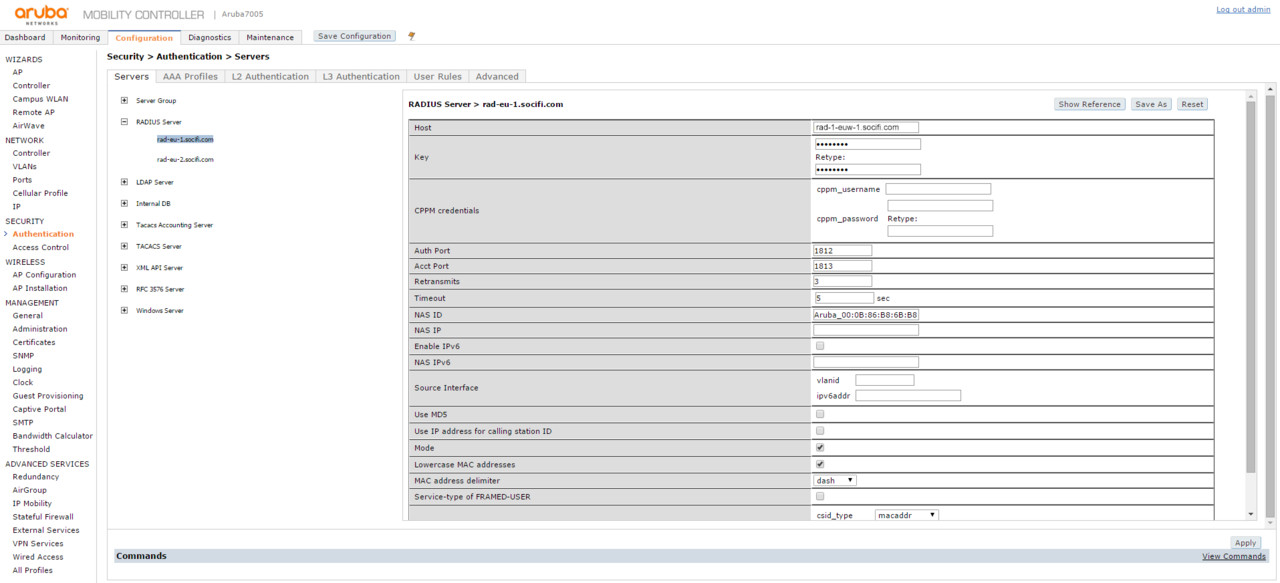
Let's set the authentication service of RADIUS server. Go to Configuration and in menu SECURITY > Authentication > Servers select RADIUS server group and create 2 records - one for Primary one for Secondary RADIUS server. (in pictured example rad-1-euw-1.socifi.com and rad-2-euw-1.socifi.com). Then fill in following values for Primary and Secondary RADIUS server:
| Host | <_hostname of radius server (e.g. rad-2-euw-1.socifi.com)_> or |
|---|---|
| Key (Retype) | socifi |
| CPPM credentials | - |
| Auth Port | 1812 |
| Acct Port | 1813 |
| Retransmits | 3 |
| Timeout | 5 sec |
| NAS ID | Aruba_<macaddr_of_controller> *) |
| NAS IP | - |
| Enable IPv6 | unchecked |
| NAS IPv6 | - |
| Source Interface | - |
| Use MD5 | unchecked |
| Use IP address for calling station ID | unchecked |
| Mode | checked |
| Lowercase MAC address | checked |
| MAC address delimiter | dash |
| Service-type of FRAMED-USER | unchecked |
| called-station-ID | csid_type = macaddr include_ssid = disable csid_delimiter = dash |
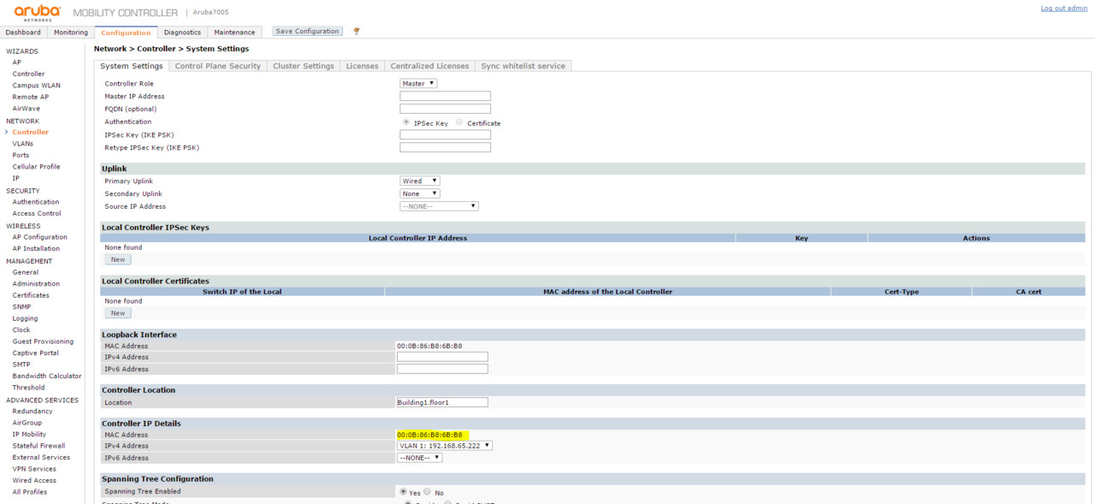
*) to determine the controller MAC address go to Configuration and then to NETWORK > Controller > System Settings and get the MAC Address in Controler IP Details tab.
We recommend to use this set of RADIUS servers:
Let's create Authentication group. Go to Configuration tab and click through SECURITY > Authentication > Servers. Click on Server Group and create a new group SOCIFI_Radius and add the two RADIUS servers created earlier. Please keep the sequence.

3. Captive portal setting
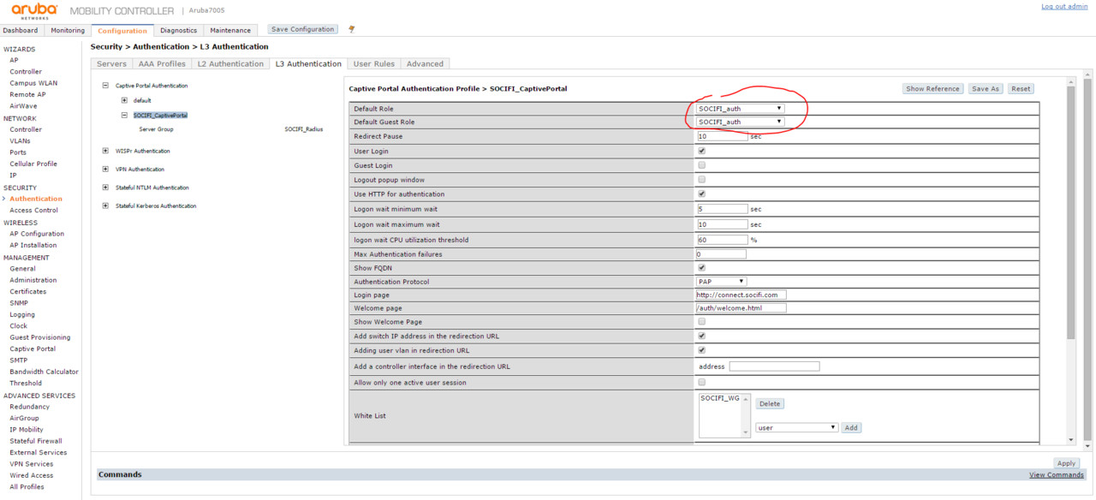
Go to Configuration tab and click through SECURITY > Authentication > L3 Authentication. In the Captive Portal Authentication group create new record we called SOCIFI_CaptivePortal. Then fill in following values:
| Default Role | guest *) |
|---|---|
| Default Guest Role | guest |
| Redierct Pause | 10 sec |
| User Login | checked |
| Guest Login | unchecked |
| Logout popup window | unchecked |
| Use HTTP for authentication | checked |
| Logon wait minimum wait | 5 sec |
| Logon wait maximum wait | 10 sec |
| logon wait CPU utilization threshold | 60 % |
| Max Authentication failures | 0 |
| Show FQDN | checked |
| Authentication Protocol | PAP |
| Login page | http://connect.socifi.com |
| Welcome page | /auth/welcome.html |
| Show Welcome Page | unchecked |
| Add swith IP address in the redirection URL | checked |
| Adding user vlan in redirection URL | checked |
| Add a controller interface in the redirection URL | - |
| Allow only one active user session | unchecked |
| White list | add "SOCIFI_WG" |
| Black list | - |
| Show the acceptable use policy page | unchecked |
| User idle timeout | - |
| Redirect URL | - |
| Bypass Apple Captive Network Assistant | unchecked |
| URL Hash Key | - |

In Submenu Server Group select already defined group SOCIFI_Radius.

4. ACL role
To be able to control users access we need to create two ACL User roles. One for pre-authentication SOCIFI_unauth and one for authenticated SOCIFI_auth.
Go to Configuration tab and click through SECURITY > Access Control > User Roles and add following ACL user role - first for pre-authentication (SOCIFI_unauth) as follows:
| MIsc. Configuration | |
|---|---|
| Re-authentication Interval | 0 minutes |
| Role VLAN ID | Not Assigned |
| VPN Dialer | Not Assigned |
| L2TP Pool | Not Assigned |
| PPTP Pool | Not Assigned |
| Captive Portal Profile | SOCIFI_CaptivePortal |
| Captive Portal Check for Acounting | checked |
| Max Sessions | 65535 |
| idp profile name | none |
| Stateful NTLM Profile | Not Assigned |
| Stateful Kerberos Profile | Not Assigned |
| WISPr Profile | Not Assigned |
| Enable Deep Packet Inspection | checked |
| Enable Web Content Clasification | checked |
| Trafic Control Profile | Not Assigned |
add these roles to Firewall Policies
ra-guard
logon-control
captiveportal
v6-logon-control
captiveportal6

roles below will get created automatically when we save the ACL (click Apply)
--------------------------------------------------------------------------
SOCIFI_CaptivePortal_list_operations
global-sacl
apprf-SOCIFI_unauth-sacl

And for authenticated SOCIFI_auth:
Go to Configuration tab and click menu SECURITY > Access Control > User Roles to create ACL user roles. Abd create role (SOCIFI_auth) using following values:
| MIsc. Configuration | |
|---|---|
| Re-authentication Interval | 0 minutes |
| Role VLAN ID | Not Assigned |
| VPN Dialer | Not Assigned |
| L2TP Pool | Not Assigned |
| PPTP Pool | Not Assigned |
| Captive Portal Profile | Not Assigned |
| Captive Portal Check for Acounting | checked |
| Max Sessions | 65535 |
| idp profile name | none |
| Stateful NTLM Profile | Not Assigned |
| Stateful Kerberos Profile | Not Assigned |
| WISPr Profile | Not Assigned |
| Enable Deep Packet Inspection | checked |
| Enable Web Content Clasification | checked |
| Trafic Control Profile | Not Assigned |
Click on tab Firewall Policies and add following roles:
ra-guard
dhcp-acl
dns-acl
http-acl
https-acl
icmp-acl
v6-dhcp-acl
v6-dns-acl
v6-http-acl
v6-https-acl
v6-icmp-acl

roles below will get created automatically when we save the ACL (click Apply):
--------------------------------------------------------------------------
global-sacl
apprf-SOCIFI_auth-sacl

5. ACL roles setting
Let's get back to the Captive portal setting. Go to Configuration tab and then to menu SECURITY > Authentication > L3 Authentication. Click Edit SOCIFI_CaptivePortal and set the Default role as SOCIFI_auth.
Finally we'll set the AAA Profil which is used by the SSID we'll use for SOCIFI. (in our guide we use socifi-aaa-profile). Go to Configuration tab and then to menu SECURITY > Authentication > AAA Profile to set it.

Let's Edit the profile using following values:
| Initial role | SOCIFI_unauth |
|---|---|
| MAC Authentication Default Role | guest |
| 802.1X Authentication Default Role | guest |
| Download Role from CPPM | unchecked |
| L2 Authentication Fail Through | unchecked |
| Multiple Server Accounting | unchecked |
| User idle timeout | - |
| RADIUS Interim Accounting | checked |
| User derivation rules | NONE |
| Wired to Wireless Roaming | checked |
| SIP authentication role | NONE |
| Device Type Clasification | checked |
| Enforce DHCP | unchecked |
| PAN Firewall Integration | unchecked |

Go to menu RADIUS Accounting Server Group and pick already defined group for authentication: SOCIFI_Radius
6. Add a new hotspot to SOCIFI Dashboard
You'll need to use the controller MAC address when adding new Hotspot in the Dashboard. Go to Configuration and then to NETWORK > Controller > System Settings and get the MAC Address in Controler IP Details tab.
Step 1: Login to SOCIFI Dashboard
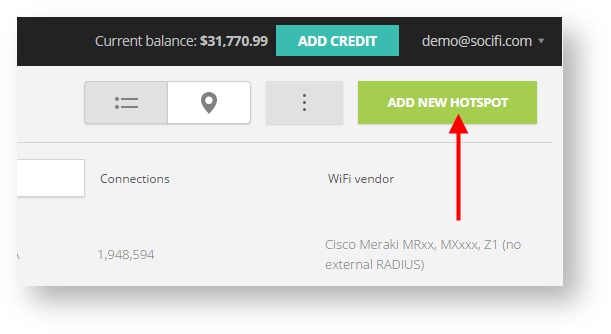
Step 2: Click on the "Hotspots" tab on the left sidebar
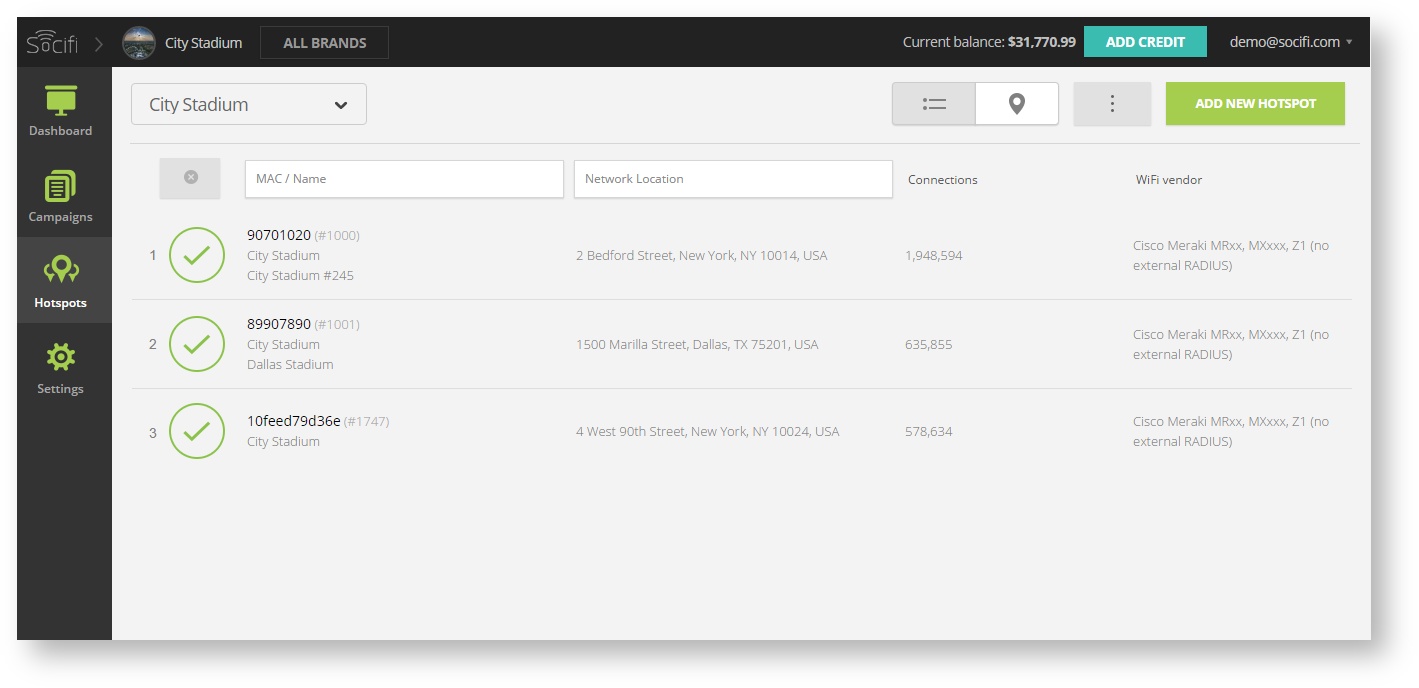
Step 3: Click on the “Add a new hotspot” button located on the top right corner on the screen (pictured below)
Note: A pop-up window will appear (below)
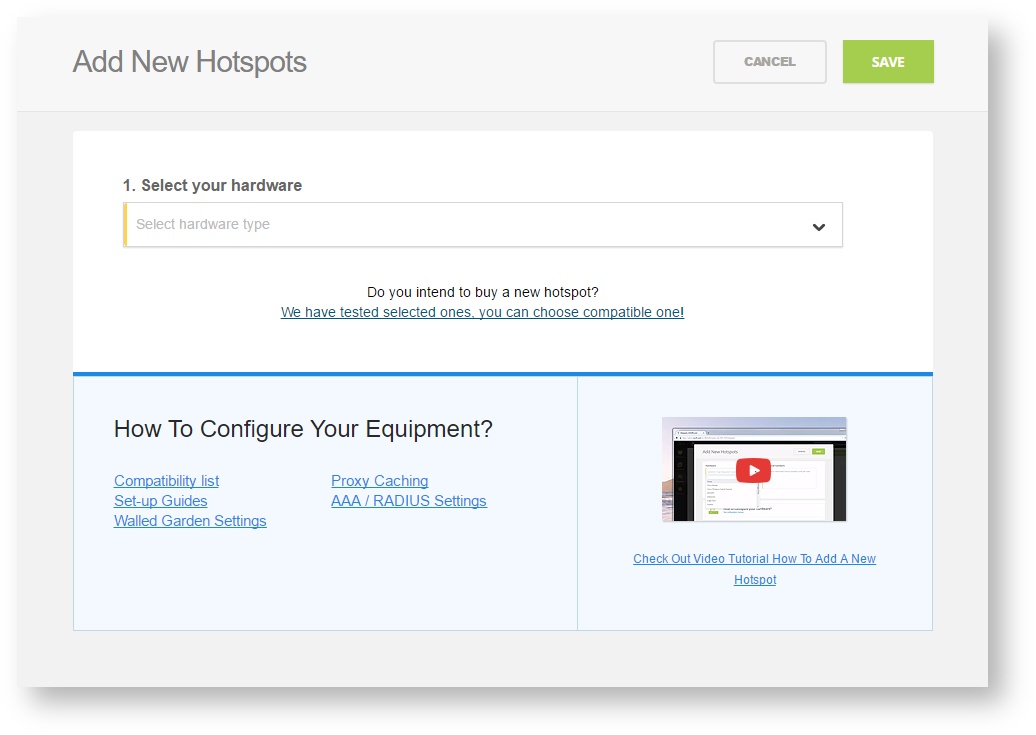
Step 4: Select the Wi-Fi hardware manufacturer from the drop down menu

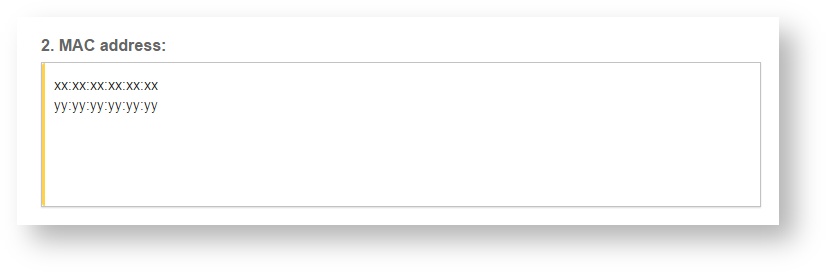
Step 5: Enter the serial number or MAC address (depending on the specific equipment manual) of your equipment. You can add multiple hotspots at once.
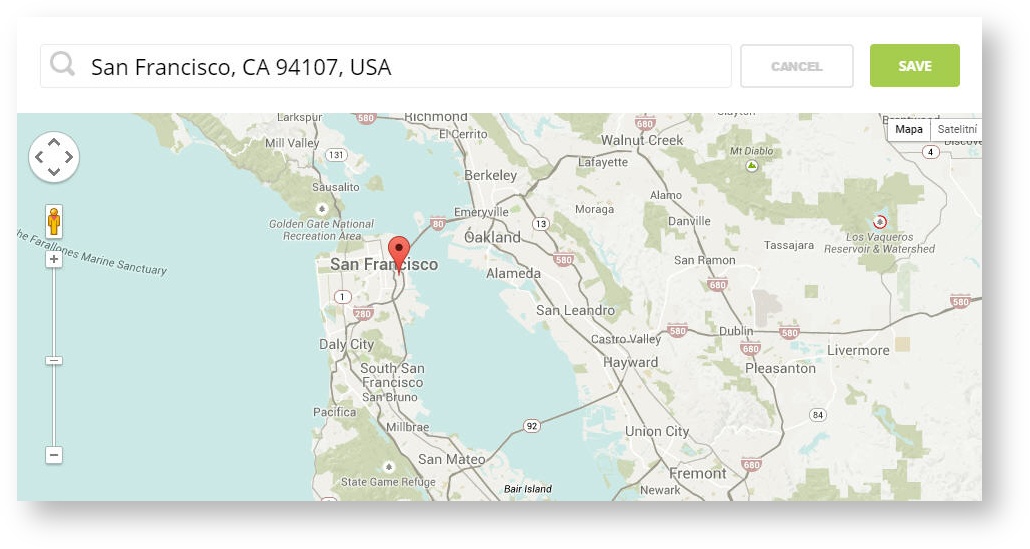
Step 6: Set your Network location (this step is essential for correct ad targeting)
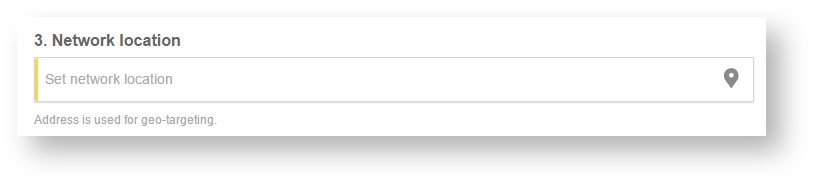
Step 7: In the pop-up window type your location or just move the marker on the map and click on the save button to confirm the selection. This address is used for ad GEO targeting.
Step 7: Click Save

Note: Newly added hotspot are marked as ![]() (Hotspot pending). After the first user connects to the hotspot via SOCIFI, the status will automatically change and appear as
(Hotspot pending). After the first user connects to the hotspot via SOCIFI, the status will automatically change and appear as ![]() (Active) within an hour. Get your first connections to test if it works properly.
(Active) within an hour. Get your first connections to test if it works properly.
